Tutorials

Fix Tool After Collapsing Isoline Display Turbosmooth

When I was modeling a sofa the other day, I collapsed one of the meshes which has a Turbosmooth modifier in Isoline Display. In fact, I didn't notice until this time that there is a bug and I didn't even notice the buggy result at that moment. Probably I was in edge mode and when I noticed the outcome pretty later that it was too late to undo.

isoline

The image above shows the problem. As you can see, the new edge loops are not there but only the vertices.
It is a very easy fix with a simple box model, but I had a complex mesh which was really hard to fix and which would take a lot of time.
I was very lucky to find this script which saved my day:

Vertex Killer by Mauricio B. Gehling 
http://www.scriptspot.com/3ds-max/scripts/vertex-killer

This tool will remove any SELECTED vertices that are shared by ONLY and EXACTLY 2 edges. Thought it might be very useful for someone who collapses the Turbosmooth in isoline display.

Making of Boho: AD3 Presentation Slides

header_news_pixela

Slides of my presentation at Academy Day3 are ready for download from the State of Art site:
http://www.stateofartacademy.com/ad3-interviews-pixela/?lang=en

The pack consists of all the slides I presented for Making Of Boho scene with all the modeling, texturing, lighting stages.

Managing Dual Monitors

Since a few days I am feeling excited that I will be able to use dual monitors. My second monitor  doesn't have great quality in contrast and color depth- in fact it is a cheap monitor but it is great to be able to move all the secondary windows to this while working. In fact it feels a bit dizzy and confusing at the beginning because hardest part is that there is no taskbar on the second monitor due to the windows 7 limitation. So I made some search and discovered very nice tools and thought it would be useful to share all these with you who are new to using dual monitors like me.

Windows Shorcuts :
If you are like me and like to use many shortcuts and hotkeys from keyboard instead of mouse, then you will love these windows system shortcuts which are very handy.

Win+Up
Maximize
Win+Down
Restore / Minimize
Win+Left
Snap to left
Win+Right
Snap to right
Win+Shift+Left
Jump to left monitor
Win+Shift+Right
Jump to right monitor
Win+Home
Minimize / Restore all other windows
MultiMon Taskbar :

mmtaskafter

This is a great freeware program that adds a taskbar in the second (even 3rd, 4th etc) monitor. You can download it from : http://www.mediachance.com/free/multimon.htm

It is very handy to have the taskbar on your secondary monitor so that you don't have to go back to your primary monitor any time you want to make something with the taskbar and saves great time.

Winsplit :

ecran

Again another freeware program to let you organise your windows with keyboard shortcuts. I installed it and I like how it works very much. You can download it from:
http://www.winsplit-revolution.com/home

Here there are two little videos about how to use the tool :
http://www.winsplit-revolution.com/screenshots/videos-demos

And they work with the dialog boxes, material editor and unwrap windows as well !Dual Monitor Management Software Comparison
There are other commercial solutions which are combined with very detailed features such as Ultramon & Actual Multiple Monitors but at the moment I decided to use the freware ones.

Here you can find a detailed comparison analysis of tools for dual monitor management:
http://en.wikipedia.org/wiki/Comparison_of_multi-monitor_software

Vray Lens Effects

Vray Lens Effects is a new tool in Vray 2.0. Last week I had time to test this new feature on my Rosso Scene night view and to share my experiments with you, I prepared one tutorial to be published on  my friend Matt Guetta's blog. The tutorial is English - only the introduction is in French. Here is the link for the tutorial:

http://www.mattguetta.com/vraylenseffect-par-alfa-smyrna/?utm_source=feedburner&utm_medium=twitter&utm_campaign=Feed%3A+mattguetta+%28matt+guetta%29

vraylenseffect_012

Creating Fury Chair with Hair&Fur Modifier

59_BD_Coffee.jpg


 I have prepared a new tutorial on Max Hair& For modifier for  Ronen Bekerman Architectural Visualisation Forums,one of the most innovative sites of the community.

This is an article tutorial telling about how to create a fury object with 3dsMax Hair and Fur Modifier. I explained how I created the chair in my scene "My Bedroom Concept."

You can check the tutorial on Ronen's site where it is hosted :

http://www.ronenbekerman.com/hair-fur-in-3d-studio-max/

Hope you find it useful.

Making Of My Bedroom Concept Scene

3DTutorial

This is a Making Of Tutorial that I have created for Evermotion, one of the leading forums of the industry.Inside the tutorial, you can find the various stages of the project Modelling, Texturing and Lighting as well as tips about how to create specific effects.

The tutorial is hosted on Evermotion site and you can follow it by clicking the link:
http://www.evermotion.org/tutorials/show/7952/modeling-and-rendering-tutorial-by-alfa-smyrna

Pebbles With Particle Flow

Pebbles

This is the 2nd part of the Ground Elements tutorial. You can find the 1st part here. In this part, I will try to explain how I create grass with Particle Flow. 

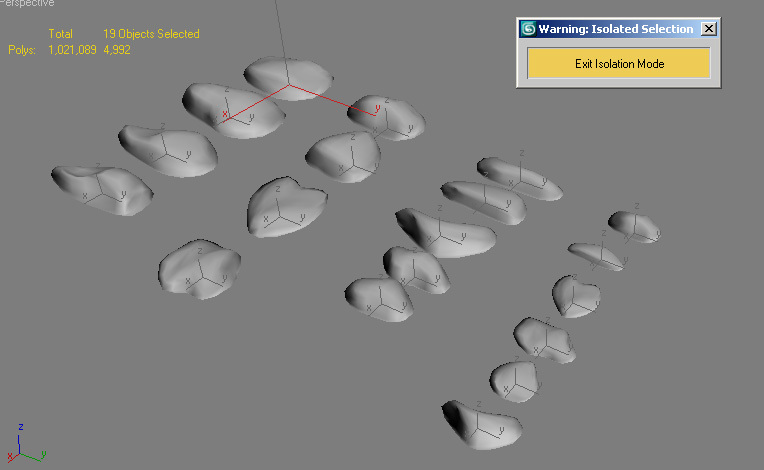
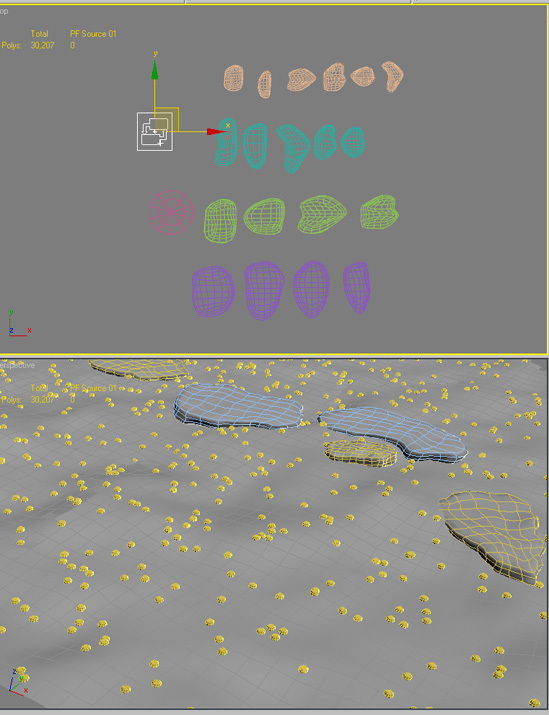
First, I modeled few different little stones. I modeled the stones of vraying sizes and shapes. 19 different stones was enough for to build the variance.

Then I converted these meshes into VrayProxy to save RAM. VrayProxy is an excellent feature of vray. Neil Blevins has written a very good tutorial about scattering objects in www.neilblevins.com After reading this tutorial, I decided to use a similar method.

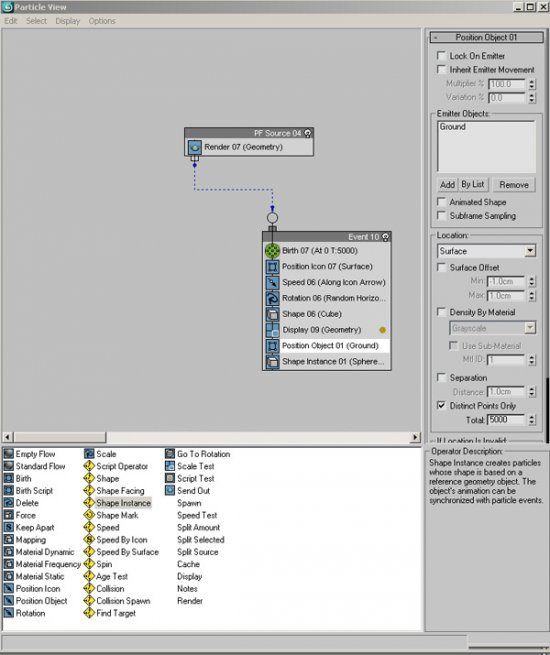
I created a Particle Source. You can control all parameters of your ParticleFlow when you go into Particle View. PLease look in the 1st part of the tutorial: Grass With Particle Flow about detailed  of Particle FLow Settings. ShapeInstance operator is to choose the particle geometry object. In my case it is the sphere. The PositionObject operator is to choose the emitter object. From birth operator, you can adjust the amount of particles. If you want to scatter different type of geometry, you can make a parent dummy object and link the child objects to this. In my case, this is not necessary.

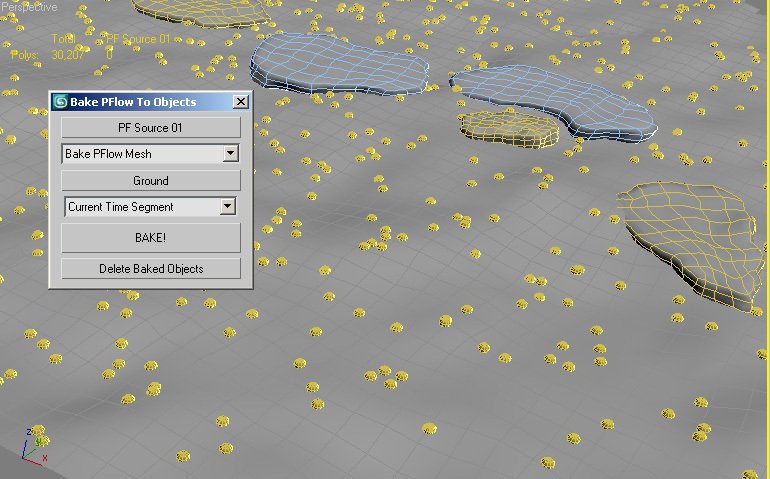
Proxy objects loose their proxy charecteristic if they are scattered directly. I replaced this sphere meshes with proxied pebble models in the later steps. After distributing the spheres with the particle flow, I baked the particles into a mesh by using Bobo's BakePFlowToObjects script. By making this, all particles become geometry so we can replace them. You can find this very useful script in www.scriptspot.com

To replacing the particles with VrayMeshes (proxy objects of little stones),I used another great script ObjectReplacer by Neil Blevins. (www.neilblevins.com) I replaced all dummy spheres with the meshes. This steps were necessary to be able to retain the proxy characteristic of the scattered objects. Position, Rotation, Scale properties are adjustable.

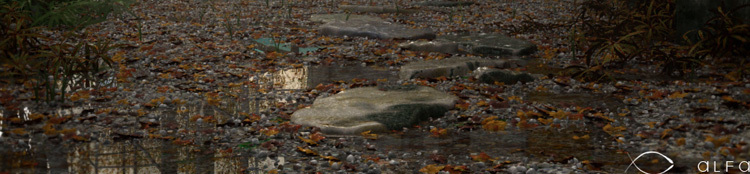
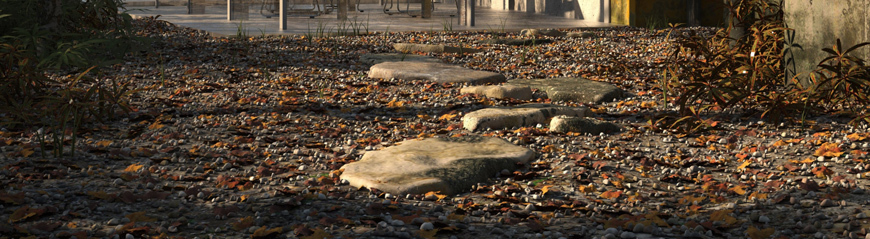
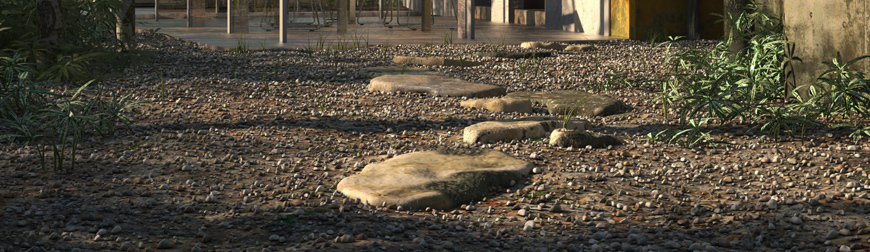
Below you can see the results I have created using this method:

Grass With Particle Flow

Grass

Actually, this is not a new tutorial; I created this as a  part of the Making of Story for my scene Time Under Trees.  But I have been requested few times to publish this part in a seperate tutorial so it can get listed in the search engines and include a grass version of the same method. This first part is about how to create grass using Particle Flow Method. (Please click on images to view in higher resolution.)

First, I modeled few different grass strands to scatter around.

Then I created a Particle Flow System.

When you click on the Particle view, you can see the settings of Particle Flow in a new window. Here as the first step, I set the Emit Start and Emit Stop value to 0 as I am not animating but using it for a still image. You can specify the number of particles.I choose my Emitter Object with the Position Object Operator. This is for schoosing the object that we scatter our particles on (emitter).


In the Rotation Operator, it is important to choose Random Horizantal. This setting provides us to limit our rotation on the surface plane, without rotating on the volume.

To choose particle geometry object (our meshes to that will scatter around), we will use Shape Instance Operator. To scatter different objects, you can group them and enable the "Group Objects" settings or you can make a parent dummy object and link the child objects to this. I used a basic primitive  box object because my target is to get use of VrayProxy Objects for my particles. I will talk about this in next steps. Now we will distribute the box object.

After distributing the boxes with the particle flow, I baked the particles into a mesh by using Bobo's BakePFlowToObjects script. By making this, all particles become a mesh so they can be replaced. You can find this very useful script in www.scriptspot.com

To replacing the particles with VrayMeshes (proxy objects of little stones),I used another great script ObjectReplacer by Neil Blevins. (www.neilblevins.com) I replaced all dummy boxes  with the meshes. These steps aew necessary to  retain the proxy characteristic of the scattered objects. Position, Rotation, Scale properties are adjustable.

And now you have your grass as geometry created with Particle FLow.

VFB history window

I have prepared a mini tutorial about how to activate the VFB History Window. This is a very useful but hidden feature of VRAY and it is one of my favorite tools.

It is a very handy feature to have your render history -Very easy to switch between previous renders with one click, and no need to save them them as a file, give seperate file names, open in an image viewer anymore! You can view all your previous renders with the 32bit VFB. To activate this feature, you need to create an environment variable:

1. Right click on MyComputer. Go to Advanced Tab. Click on the  "Environment Variables" button at bottom of the window.

2.  Click on "New"

3.  Make a new Environment Variable as shown in the image:

Now when you start max and render into VrayFrameBuffer, on the right bottom of VFB window , you will see a new button which opens and close the history window. 

You will be asked  to assign a temp path in your first usage. And this is all :) From now on, you can compare your renders by clicking on the thumbnails in your VFB History.